How To Repair Cracks in a Concrete Driveway – Cracks in your concrete driveway can be unsightly and, if left untreated, can worsen over time. Whether caused by weather, soil movement, or heavy vehicle use, addressing these cracks early can prevent costly repairs down the line. Luckily, repairing concrete cracks doesn’t always require professional help—you can tackle this DIY project with a few tools and materials.
In this guide, we’ll walk you through the step-by-step process of repairing small and large cracks, ensuring your driveway remains durable and visually appealing. We’ll cover everything from cleaning the area to applying patch materials for a seamless finish. By following these simple steps, you can extend the life of your driveway and restore its smooth surface. Read on to learn how to fix those cracks and protect your investment.
How To Repair Cracks in a Concrete Driveway?
1: Clean the Crack Thoroughly
Before beginning any repair, it’s essential to clean the crack thoroughly. This ensures that the repair materials adhere properly to the concrete. Start by using a wire brush to remove loose debris, dirt, or small pieces of broken concrete from the crack. A pressure washer or a hose with a high-pressure nozzle can also help flush out dirt, grime, and dust that may be lodged deep within the crack. Once you’ve removed all loose particles, allow the crack to dry completely. If moisture is left behind, it could compromise the bonding of the repair material.
For larger cracks, consider using a chisel and hammer to widen the crack slightly, creating a V-shape. This will allow the repair material to fill the gap more effectively, providing a stronger bond. After widening, use a shop vac or broom to remove any additional dust or debris. Ensuring the crack is completely clean is one of the most important steps in the repair process. Failure to do so can result in premature cracking or failure of the patch material.
Also Read:- Tips For Effective Concrete Maintenance
2: Apply a Concrete Bonding Adhesive
Concrete bonding adhesive is a critical step that many DIYers overlook. This adhesive helps the new patch material bond to the existing concrete surface, ensuring a longer-lasting repair. Apply the bonding adhesive with a paintbrush or roller directly into the crack and along the surrounding edges. Make sure the adhesive is evenly spread, covering the entire area where the repair will be made. Depending on the product you’re using, you may need to wait for the adhesive to become tacky before proceeding.
Some adhesives are designed to be used immediately, while others may require a bit of drying time. Be sure to follow the manufacturer’s instructions closely for the best results. Skipping this step or applying it incorrectly can lead to poor adhesion, causing the crack to reopen over time. Bonding adhesive is especially important when dealing with larger cracks, as it ensures the patch material integrates seamlessly with the old concrete, providing a durable repair.
3: Fill the Crack with a Concrete Patch
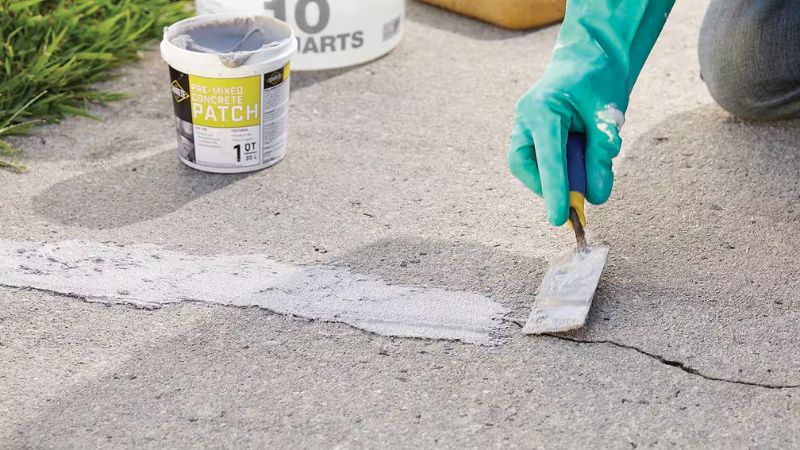
Once the adhesive has been applied and is ready, it’s time to fill the crack with a concrete patch. For small cracks (less than ½ inch wide), you can use a concrete crack filler, which typically comes in a caulk-like tube. Simply squeeze the filler directly into the crack, smoothing it with a putty knife or trowel to ensure an even surface. If the crack is larger, you’ll need to use a concrete patch mix. Follow the manufacturer’s instructions to mix the patch material, ensuring it has the right consistency.
For larger cracks, pour the patch mix into the crack, pressing it firmly to eliminate any air pockets. Use a trowel to smooth the surface and blend the patch material with the surrounding concrete. Depending on the size of the crack, you may need to apply the patch in layers, allowing each layer to dry before adding the next. This prevents sagging or shrinking of the material as it dries. Be sure to fill the crack completely and level it with the rest of the driveway for a seamless appearance.
4: Allow the Patch to Cure
After filling the crack, it’s essential to let the repair material cure properly. Curing ensures the patch hardens and bonds securely with the concrete, creating a durable, long-lasting repair. Follow the manufacturer’s recommendations for curing times, which typically range from 24 to 48 hours, depending on the product and weather conditions. During this period, avoid walking or driving over the repaired area to prevent any disturbances that could weaken the patch.
In hot or dry weather, you may need to cover the repaired area with a plastic sheet or a damp cloth to retain moisture. This helps the patch cure evenly and reduces the chances of cracking or shrinking. Keeping the area protected from rain, direct sunlight, and excessive heat is critical during the curing process. Once the patch has fully cured, the repaired crack will be solid and ready to withstand daily use.
5: Seal the Driveway for Added Protection
Once the patch has cured, the final step is to apply a concrete sealer to protect the entire driveway from future damage. Sealing the surface will help prevent water infiltration, UV damage, and stains from oil or other substances. Choose a high-quality concrete sealer that is suitable for driveways and apply it with a roller or sprayer, ensuring an even coat over the repaired area and the rest of the driveway.
Sealing your driveway not only improves its appearance but also prolongs its lifespan by providing a protective barrier. It’s recommended to reseal your driveway every 2 to 3 years to maintain optimal protection. By regularly sealing the surface, you can prevent small cracks from forming and avoid the need for frequent repairs. After sealing, allow the surface to dry according to the product’s instructions before using the driveway again.
Also Read:- Difference Between Cement and Concrete
6: Regular Maintenance to Prevent Future Cracks
After successfully repairing the cracks and sealing your driveway, regular maintenance is key to preventing new cracks from forming. Inspect your driveway regularly for any signs of wear or damage, especially after extreme weather events. Address small cracks or holes as soon as you spot them to prevent them from worsening over time. Cleaning your driveway periodically will also help remove dirt, debris, and oil that can deteriorate the concrete surface.
In addition, avoid placing excessive weight on the driveway, as this can contribute to cracks. Heavy vehicles, like large trucks or RVs, should not be parked for extended periods, as they may cause strain on the concrete. By maintaining your driveway and addressing issues as they arise, you’ll extend its lifespan and keep it looking great for years to come.
Conclusion
Repairing cracks in a concrete driveway is a cost-effective way to maintain its appearance and prevent further damage. With the right materials and a little effort, you can restore your driveway’s durability and enhance curb appeal. Regularly inspecting for cracks and addressing them early is key to avoiding more extensive issues. Whether you’re fixing small hairline cracks or larger gaps, these repair techniques will help you preserve your driveway for years to come. So, don’t wait—start your repair project today and enjoy a smooth, long-lasting driveway.
FAQs
What causes cracks in a concrete driveway?
Cracks are typically caused by weather changes, soil movement, heavy loads, or improper installation.
Can I repair large cracks in my concrete driveway myself?
Yes, with the right materials and tools, you can repair large cracks, but severe damage may require professional help.


